How To Put Together A Tech Spec: The Stage Plot and Channel List
As a promoter and a tour manager, I’ve lost count of the number of times I’ve asked for a bands tech spec and they’ve either said they don’t have one, replied with a couple of hastily thought up notes about what instruments are on stage or just not responded.
Sure, a decent sound engineer will make the show work without one, but being able to communicate what you need in advance will let them prepare for what to expect, speed up the set-up and soundcheck process, and make for a better experience for you and the audience.
Unless you’re constantly changing your line-up in fundamental ways, putting together a tech rider doesn’t take long and only needs to be done once (as long as you keep it updated). You don’t even need to know much beyond what instruments will be on the stage and how they will be connect to the sound desk - though any technical knowledge or sonic preferences you do have can be communicated if you feel that you want to do so.
A Tech Spec, or Technical Rider, in its basic form is made up of two documents - a Stage Plot and a Channel List.
What is a Stage plot?
The Stage Plot is a visual diagram that shows where each band member and significant piece of gear goes on the stage. It’s helpful for house sound engineers in the first instance - allowing them to pre-prepare microphones in the correct space on stage and plan what they’ll do when changing the stage setup between different performers on a bill. It’s also helpful for lighting engineers - helping them position spot lights and plan lighting states for the show that will work best with the number of musicians on the stage and their positions.
A good stage plot will include:
The position of each performer.
All the instruments on stage.
The location of any amplifiers, monitors, mic stands and DI boxes.
Any power needs, i.e. where you need plug sockets or extension cables to be positioned, and how many.
It might also include the position of any pedal boards.
Remember, keep it simple - You’re trying to communicate specific information clearly, and clarity should be prioritised over design. That said, I enjoy a stage plot that communicates a bands personality a great deal.
How can I create a Stage Plot?
Making a stage plot can be a little fiddly and time consuming. You could just draw it on a piece of paper and scan or photograph it if needs be - but there are a number of digital tools that make it easier to create something easier to keep up to date. Microsoft Word, Powerpoint and Apple Pages all have drawing tools that can work in a pinch, as do Adobe Photoshop, Illustrator or Canva if you happen to have access to those. Basically, anything you have on your computer that lets you draw circles, squares, lines and add text will work.
There used to be a fantastic piece of software called Stage Plot Pro, but unfortunately the creator passed away recently, and it is no longer supported.
Example Stage Plots
Here’s a couple of stage plot examples from small to medium size artists with varying complexity.


What is a Channel List?
A channel list is a text-based list of all the audio inputs to the sound desk from the band. It helps the engineer patch (or plug in) the correct mics and cables in the correct order, allowing them to get a head start on setting up before you even arrive at the venue.
A good channel list will include:
The channel number on the mixing desk
The instrument, or part of the instrument in question
Whether it requires a mic or a DI box, and any preferences for what sort of mic (if you have one).
If the channel requires any effects inserting (don’t worry about this unless you know what you need!)
Whether you are bringing the mic, if you are.
If you don’t know much or anything about mics, don’t worry! You can just list the instruments you want plugging in and leave it up to the sound engineer to make their own decisions about what to use. Try to just indicate whether it needs a mic, or if it will plug in with a cable, just write DI.
When you’re first starting out you will be limited to just the mics that the venue or engineer owns, so they may not be able to use what you request anyway. infact, listing some incredible, high end or vintage microphones might just confuse things. If you do list mics, try to go with safe, industry standard options that the venue is likely to have.
What Order Should I List the Instruments in?
If your set-up includes a drum kit, it’s standard practice to start with the kick drum, The snare drum, then the toms in decreasing order of size moving left to right on the stage as the audience look at it. Then move on to the cymbals (usually just the hi hat and a pair of “overhead” mics). Once you’re done with the drum kit, the bass guitar would be next, then move left to right across the stage (from the audiences perspective). Vocals go last, again left to right, or main vocal followed by backing vocals.
Remember to include any backing tracks, talkback mics (mics which are just used for talking just to the engineer or each other on stage) and any other technical needs that the engineer might need to be aware of.
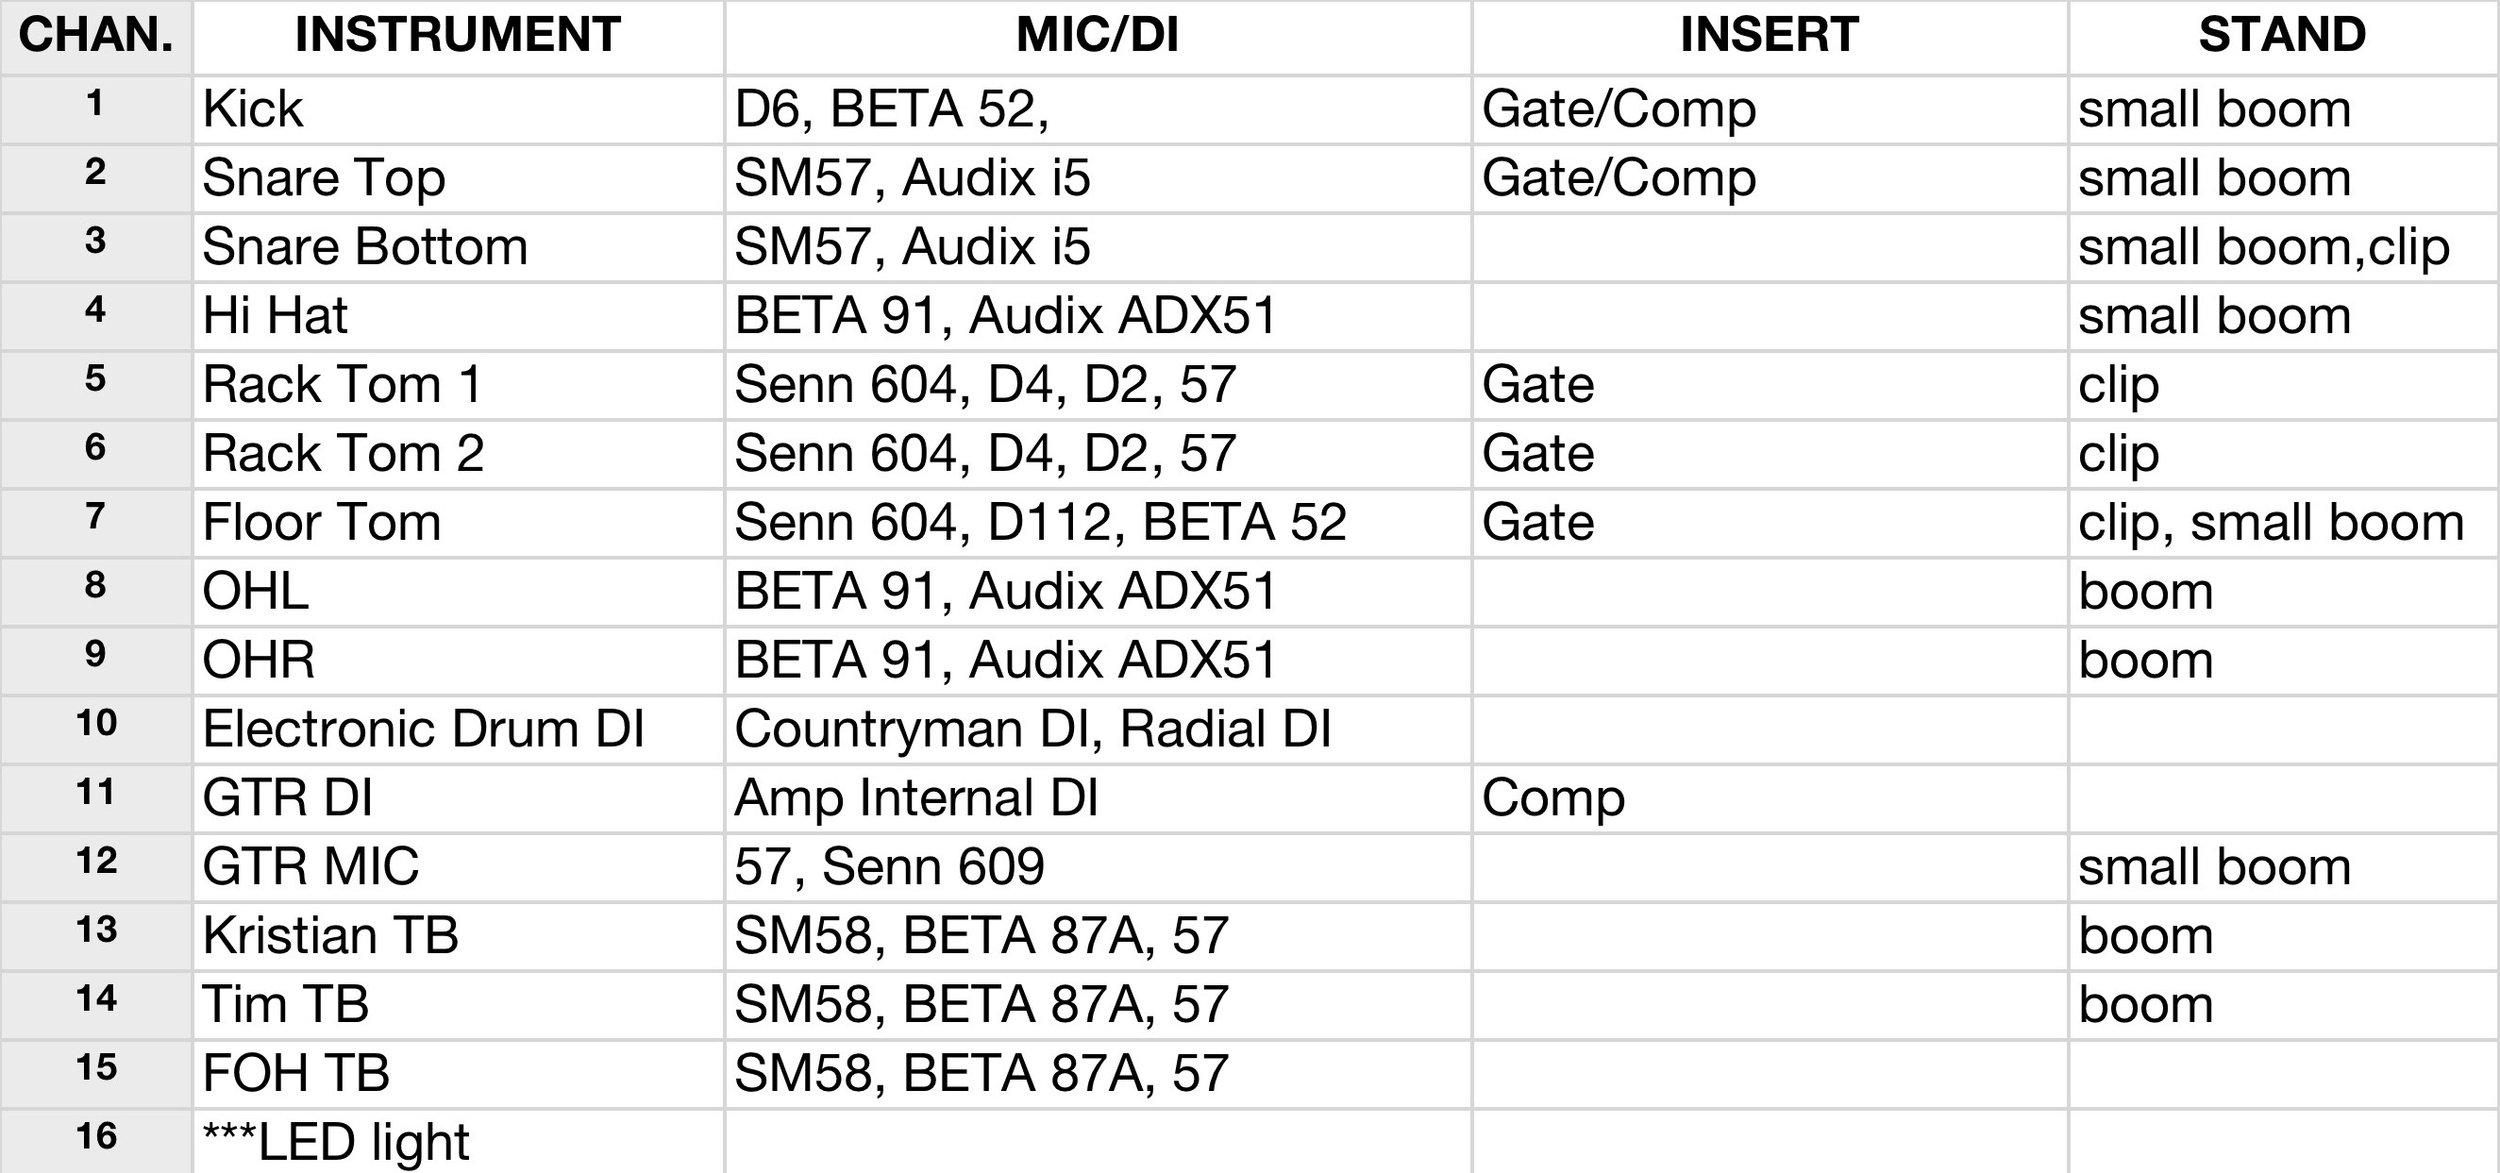
Example Channel ListS
Here’s a couple of example channel lists from small to mid size artists with varying levels of complexity.

How should I save and send them?
Export both the stage plot and the channel list as PDFs, or combine them in to one “Tech Spec” PDF if you can. Try and keep them both under 1MB so they’re quick to email and save.
It’s good practice to save them with your band name and the date, so you know you’re looking at the correct one, i.e. TheBeatles-StagePlot-Jan-2025.pdf
Keep a copy in a Dropbox or Google Drive so you can share a link or send the file itself when needed. Make sure you can open them on your phone for quick reference!
Email them in to the venue / sound engineer / promoter at least a week ahead of time ideally - you don’t have to wait to be asked - and maybe bring a printed copy you can offer to the engineer or stage manager on the day.
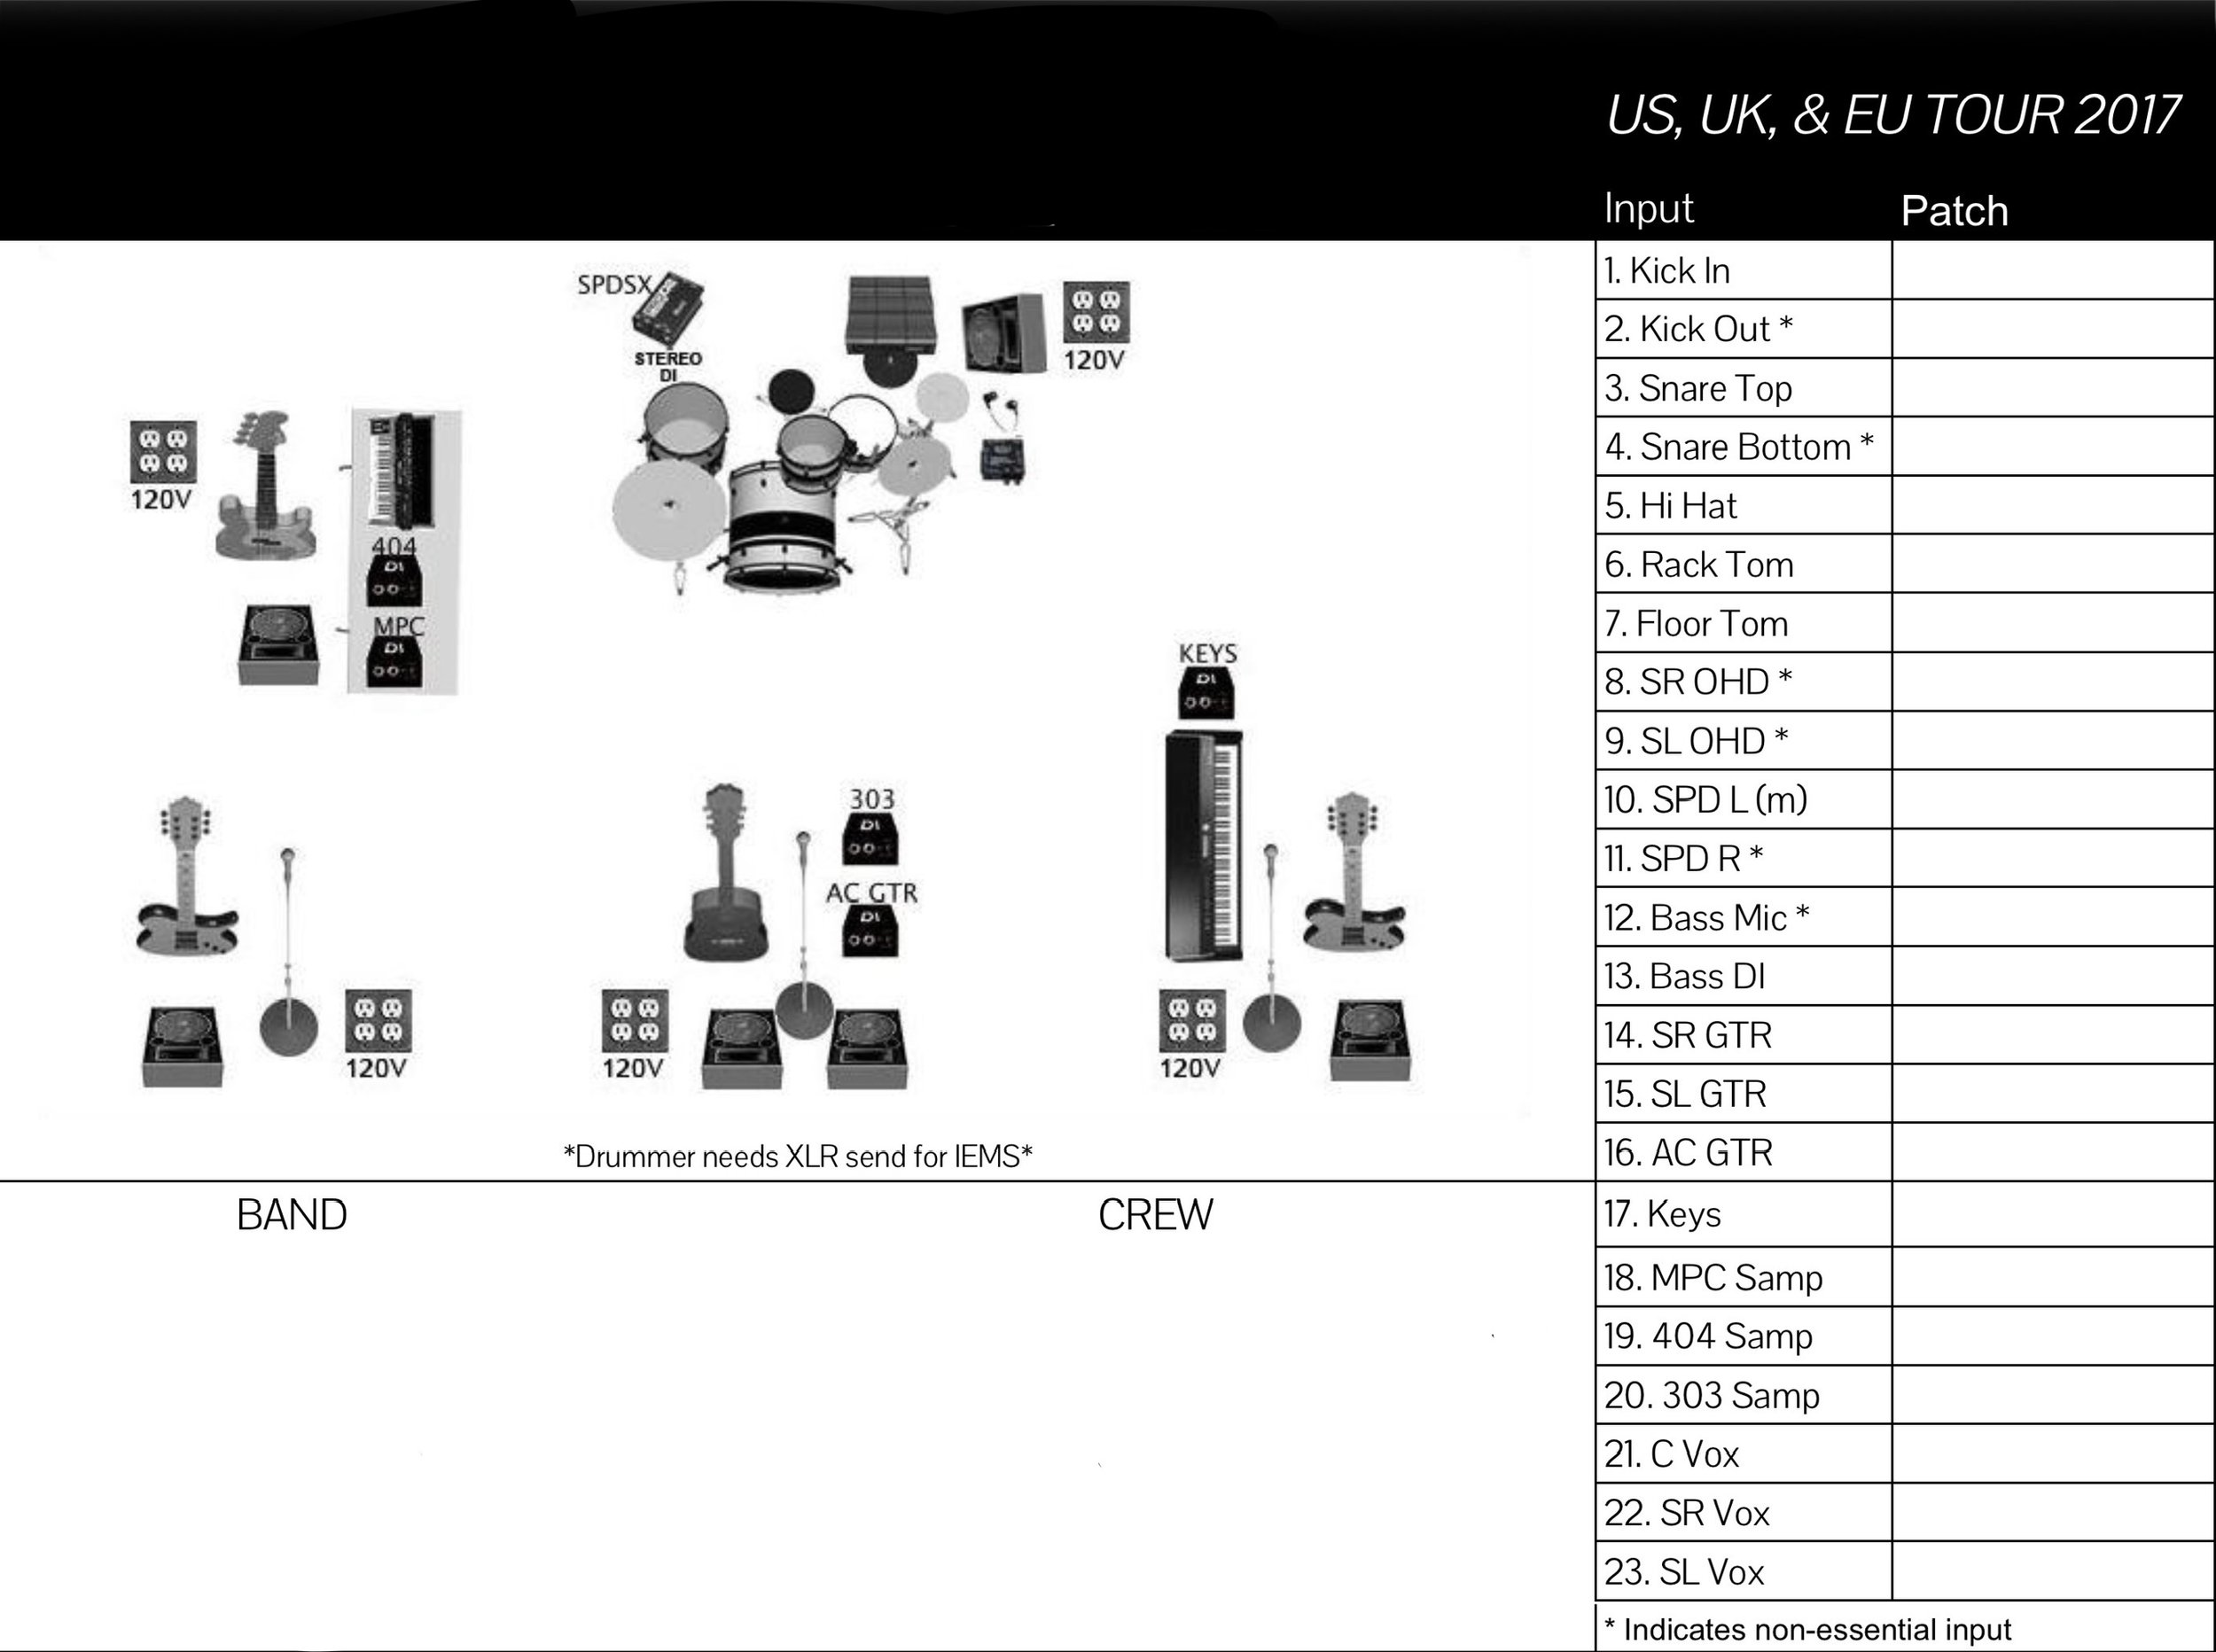
An example combined stage plot & Channel list
Sounds Simple - How can I Mess This Up?
You might make the stage plot so complicated its difficult to decipher
You might spend all your time making your stage plot funny and forget to include everything needed.
You might forget to update both documents when your line-up changes
You might forget to include where you need power to be provided
You might forget something thats a bit less obvious, like your backing track
You might save a jpg on the stage plot thats too low res to read
Conclusion
A stage plot isn’t a total safety net to protect you from chaotic sound engineers or poorly equipped or maintained venues, but it gives you a fighting chance of having a better experience. Being prepared and professional shows that you care about how you sound, and that you want to help the engineer do their job to the best of their abilities - it might even convince them you’re worth putting in the work for.
If they can’t deliver everything exactly as you’ve asked for on your tech rider, have a conversation about how to make it work in a way that doesn’t compromise the show too much. By sending your rider in advance you give them the opportunity to raise any potential issues and find solutions before you get to show day itself.
My last bit of advice is to always be respectful of the house engineer, even if they’re a little difficult. You need them on your side for the show!